Here's my interpretation of the last lesson from Effy's 8-week online class Facing Forward II : the things we need to hear. She began as a tilted head girl drawn with charcoal pencil and then softened with a blending stump -
I love the look of her over that base text in my recycled art book. So much that I didn't want to follow the rest of the lesson and add any colour! So she sat for a couple of days until I felt what she needed : some music, a few stars (to symbolise my word of the year SHINE) and some words
Here is the page complete. Click on the photo to see larger detail.
Effy is an incredibly generous teacher and she gave us a bonus technique to finish with. I shared my try at that as part of my weekly journaling in my previous post. I forgot to take process photos unfortunately. First I traced over this photo of me to transfer with carbon paper
Then used a charcoal pencil and smudged it with a blending stump - when I sprayed with fixative though the blue carbon showed through! I had to disguise that by adding colour so she's ended up a bit more mixed media than first intended. Good learning though. A friend still recognised her as a self-portrait.
Sad to see this class end - I've spun it out as long as I could!! Thankfully I am still part of her Book of Days class and our second session starts 1st May. Enrol for the year of Book of Days, or the second session (May-July) AND Facing Forward II HERE.
See all the blog posts about the faces I've created in this class HERE. See my Flickr album for all my art from classes with Effy HERE.
Friday, April 28, 2017
Tuesday, April 25, 2017
Daily Journaling Week 17
A few things going on this week affecting my response to the prompts. This week's prompt from the blog for Life Documented 2017 HERE : Illustrate a quote (Earth Day Bonus prompt: use recycled materials). Technique: Drawing and shading a face (mixed media)
I've also been working with the prompts of the original Documented Life 2014 : Week 17 is to Photograph or draw your favourite shoes.
You may remember that Week 16's prompt included "add photos". I took the easy option with that spread and just added some photos as part of my daily journaling. But when I'd first seen the photo prompt, I'd had a couple of ideas which I'd left in favour of the easy option. I decided to include both of those ideas this week, and I'm actually going to include all 5 prompts (above in green).
To begin was easy. It's ANZAC day in New Zealand today and I had a lovely sticker tape of poppies I wanted to include on the spread - and obviously to include all those prompts I need a flap!
1. Use recycled materials I was hoping the red ink on this underpaper was still water-soluble, and when I ran gel medium over the top as well it all blended out and onto the page ♥
2. Add photos I decided to spread my day blocks out to give me space for larger photos with my journaling and I decided to feature art in the middle for a change. More on the poppy further down...
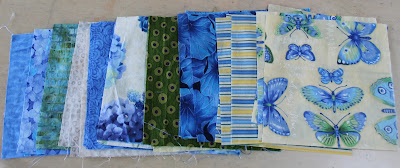
3. Photograph or draw your favourite shoes.This fun prompt made me photograph the beginnings of my next fabric project in a different way :-)
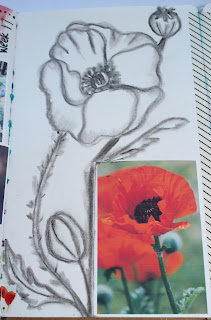
4. Add photos I wanted to use a photo as a beginning of a drawing. Here I've extended the poppy idea with charcoal pencil and a blending stump.
Sprayed with workable fixative before adding colour with watercolour pencils. The finished poppy also includes the prompt Illustrate a quote.
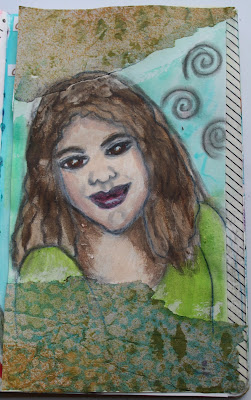
5. Drawing and shading a mixed media face. I've been trying to complete my Facing Forward II class lessons from Effy Wild while I have time in the holidays. Popped down some more recycled under paper, and then used Effy's method from her final bonus lesson of using a photograph as the base of my mixed media face. I forgot to take process photos and I regret that! Traced over this photo of me to transfer with carbon paper
Then used charcoal pencil and smudging - when I sprayed with fixative though the blue carbon showed through...so she's ended up a bit more mixed media than first intended! Fits the prompt though.
Here's this week's finished spread with flap closed
and open
There's some space left for my journaling of Wed-Fri this week. Friday we go to Wellington to watch my eldest son in a basketball tournament for a couple of days, and then we're back to school on Monday! Enjoy the end of April.
You can see all my posts about this project HERE and my Flickr album HERE
Sunday, April 23, 2017
Disappearing 9 Patch Quilt Completed
The invitation to give a talk about my quilts to the Levin club earlier this month prompted me to start quilting my Disappearing 9 Patch. This quilt is really simple to do and can look very different depending on how you lay it out. I started mine with a variety of fat quarters all from my stash.
The hydrangeas, butterflies and stripe were all purchased together. I added the 2 greens and some supporting blues. You can cut 9 x 6 1/2" squares from one fat quarter - some of my fat quarters weren't quite large enough (had bits cut out of them!) so I just added a few more coloured squares for variety, and used a selection of creams/lemons instead of just one fabric for that. I pieced them into 9 patches varying the positions of the fabrics.
I know my quilt is going to look good because it even looks okay with this very simple configuration on the design wall. Then I started slicing and rearranging :
Above is an original block sliced through the middle both ways. Then rearrange in different configurations to see what you like best
Of course this is within the same block...imagine the possibilities once you're playing with all of your original 9 blocks now cut 4 ways = 36 to play with :-) This is my top stitched together and ready to layer with batting and back for quilting
I was going to quilt with straight lines, but decided instead to follow my heart with a favourite free-motion spiral using a lovely variegated thread.
Yesterday I was trimming off the edges ready for the binding which happened last night
And here it is completed : Click on any photo to see it larger
Free-motion quilting of spirals except where butterflies are outlined. Below is the back view - see the butterfly? I used a plain rayon on the back.
This is a really simple quilt for beginners but looks so effective
If you want to have a go, I found these variations - all FREE patterns
I love this random look - free pattern at Craftsy
Adore this colour combo of red and blue : 4.5" blocks cutting instructions HERE.
Large pattern called Queen Charming in Tula Pink fabrics free pattern HERE
Find the controlled colour version Halloween quilt HERE (block size cut 5"). Let me know if you make one. If you're new here and want to see other quilts I've made, check out those posts HERE.
Heading into Week 2 of our school holidays, and although I haven't completed as much art as I hoped, I'm very happy to have this quilt finally done and excited to start my next stitching project. Happy weekend to you.
The hydrangeas, butterflies and stripe were all purchased together. I added the 2 greens and some supporting blues. You can cut 9 x 6 1/2" squares from one fat quarter - some of my fat quarters weren't quite large enough (had bits cut out of them!) so I just added a few more coloured squares for variety, and used a selection of creams/lemons instead of just one fabric for that. I pieced them into 9 patches varying the positions of the fabrics.
I know my quilt is going to look good because it even looks okay with this very simple configuration on the design wall. Then I started slicing and rearranging :
I was going to quilt with straight lines, but decided instead to follow my heart with a favourite free-motion spiral using a lovely variegated thread.
Yesterday I was trimming off the edges ready for the binding which happened last night
And here it is completed : Click on any photo to see it larger
Free-motion quilting of spirals except where butterflies are outlined. Below is the back view - see the butterfly? I used a plain rayon on the back.
If you want to have a go, I found these variations - all FREE patterns
I love this random look - free pattern at Craftsy
Large pattern called Queen Charming in Tula Pink fabrics free pattern HERE
Find the controlled colour version Halloween quilt HERE (block size cut 5"). Let me know if you make one. If you're new here and want to see other quilts I've made, check out those posts HERE.
Heading into Week 2 of our school holidays, and although I haven't completed as much art as I hoped, I'm very happy to have this quilt finally done and excited to start my next stitching project. Happy weekend to you.
Wednesday, April 19, 2017
Daily Journaling Week 16
I'm following the prompts of the original Documented Life 2014. Week 16 : add a cardboard food box in a creative way. And from the blog for Life Documented 2017 HERE : add photos.
We started this week with Easter weekend, so seemed obvious that my cardboard food box would be packaging from one of the boys' eggs.
I began this spread with overlapping tape from last week's flap addition, some seepage in the middle, and some cleaning off of paint onto the page. Prettied it up with some sprays and a circular stencil
Decided I needed to get into the Easter theme so laid down some egg-shaped masks and sprayed with black
This created pretty soft eggs and the opportunity to messily outline with lovely gold
Going back to my original prompt, I used the cardboard packaging by featuring the bunny with lovely words for Easter (also outlined with gold), and I cut out individual daisy shapes and used them to date the journal spaces.
I often add photos to my spread as part of my journaling. This is how it looks so far.
You can see all my posts about this project HERE and my Flickr album HERE
We started this week with Easter weekend, so seemed obvious that my cardboard food box would be packaging from one of the boys' eggs.
I began this spread with overlapping tape from last week's flap addition, some seepage in the middle, and some cleaning off of paint onto the page. Prettied it up with some sprays and a circular stencil
This created pretty soft eggs and the opportunity to messily outline with lovely gold
Going back to my original prompt, I used the cardboard packaging by featuring the bunny with lovely words for Easter (also outlined with gold), and I cut out individual daisy shapes and used them to date the journal spaces.
I often add photos to my spread as part of my journaling. This is how it looks so far.
You can see all my posts about this project HERE and my Flickr album HERE
Monday, April 17, 2017
FFII : Week 7.5 Bonus lesson
Hope you've had a happy Easter. I've had some lovely catch-ups with family and then got some good creative time today ♥
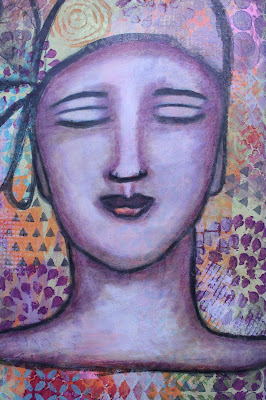
We are on hiatus for a month from Book of Days, and it's a chance to catch up on some other art. Effy Wild is an incredibly generous teacher and although we were promised 8 lessons for Facing Forward II : the things we need to hear, there were a couple of bonus ones. This lesson was originally presented when the outcome of the US Elections was first known #artistsforlove. You may have also seen this shared as part of Journal 52 : you can get the time lapse video HERE. This is Effy's art :
I decided I just wanted to make a single page spread
My outline - loving her already ♥
A layer of gesso and then Effy demonstrated a method of blending a Pitt Pen big brush marker with a copic. Since I didn't have a copic of suitable colour, but I do have the big brush Pitt Pen in light flesh, I thought I would try my Tombow blending pen and it worked well.
Sealed with clear gesso (remember you can see all of this in the time lapse video linked above) then added coloured pencil with blending stump - I used my Faber-Castell Polychromos Red-Violet
Love how the orange from the original layers shines through on her bottom lip. Adding turquoise and gold...two of my fav's.
I like to include my word for 2017 SHINE in my work. This time it's not an obvious use of the word, but it's one of the reasons I added the gold, and why I decided on the affirmation : because I don't want to just rush through these holidays, and because aspects of my word are to Notice and to Enjoy.
Here she is complete.
See all the blog posts about the faces I've created in this class HERE. See my Flickr album for all my art from classes with Effy HERE.
Friday, April 14, 2017
Daily Journaling Week 15
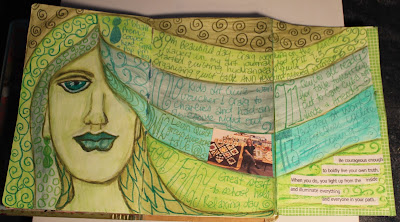
I'm following the prompts of the original Documented Life 2014. Week 15 : Monochromatic - use shades, tints and hues of one colour. And from the blog for Life Documented 2017 HERE : Add chalk or coloured pencil. Funnily enough, I had already thought I needed to do something different than floral themed this week, and hoped a face would fit the prompts somehow...When I went to Week 15 of the original 2014 prompts I found that a few of them had decided to do faces! Began by gathering my watercolour pencils to decide where I had the most shades of one colour - I have both Inktense and Graphitint.
I've been so busy this week, I hadn't actually started this spread. It turned out to be a good thing. I had written an email this morning which I decided to print out and keep as a memory of exactly where I am as I start our holidays. Need a flap with a pocket to hold that. I used sprays for the colour here though
Then it was time to make my monochrome girl - her hair makes the journaling spaces. All of this is done with the watercolour pencils blended with water. All my original work but obviously influenced by what I've been learning in Effy's classes ♥ Click on any photo to see it larger.
I wanted to include this lovely "Shine" quote from a recent Brave Girls Club email message
Added some more doodles with the same pencils and she's ready for the week's journaling
Here she is finished :
I used various shades of green pens for the journaling. Here's how she looks with the flap closed :
You can see all my posts about this project HERE and my Flickr album HERE.
Today marks the start of 2 weeks of school holidays for my boys and me. I have a looong list of what I want to get done : a mix of creative, home and work-related. I am going to try and do house & garden stuff in the morning, creative fun in the afternoon, and work-related planning for next term in the evenings AND I have a large pile of good books beside my bed to read at night. Doing this spread was my afternoon creative fun today so I've made a good start :-)
Subscribe to:
Comments (Atom)


