This year Documented Life looks very different from 2015. They've gone back to their roots of using a planner (sneak peeks HERE). I'm not interested in a planner, but I think I can still have fun with their prompts and printables in my new daily journal.
Started with my lovely inky background for the zentangle butterfly (see my previous post). Click on any photo to see it larger.
There was a bonus tutorial on painty reinforcers so I had a go at that, and we were to create a pocket art card with a "16" on it. One of their printables was a fun list titled "loving this"
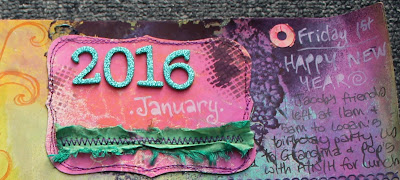
I printed the list on some inky paper, and decided to use it to list things I'm loving about January - our summer holidays. Note how I used the reinforcersI think we will be directed to create some kind of art card each week - sometimes I'll just use the prompt directly in my journal, but this time I glued some inky paper to cardstock and traced a cool tag shape on the back and cut it out. Then I was able to add some extra paint and stitching around the edge. One of our other free tutorials was from Rae about how to make this gorgeous hand-dyed ribbon (found this photo on her blog HERE):
I haven't had a chance to try her method, but I thought if I added a piece of sari ribbon to my card that might remind me of the prompt later. And it was easy to include the "16"
I love that I am able to add stitch to my journal in this way. I started adding my elements to the page along with daily journaling. Note I used another inky reinforcer top right. One thing I'd forgotten was not to go too dark in my background - you can use a white pen for journaling, but if that is over dylusions spray it will reactivate and not be a pure white as above. Another solution to lighten your background is to apply some gesso through a stencil
I also had a word on the original page background I wanted to cover up, so the tape worked well for that purpose and additionally added another pretty element to the page. I'm not restricted with space for how much I write for my daily journaling on these pages, so the number of days on each spread will vary. This is the completed spread with the daily journaling. I have a Flickr set for completed daily journal spreads HERE.
And then I turned the page and started my next spread with thoughts of keeping the background lighter, and making use of some of my stencils
The flower above is a new stencil from Spotlight, and the background tapa pattern one of my favourites. Another favourite is this blue stencil below - I positioned it to try and disguise the text on the page - maybe I'll use a layer of gesso next time...or maybe not. I like using different kinds of text in my work.
I especially like the effect when you clean off your dirty stencils on to another part of the page. Sometimes I flip them over, but because the paint was fairly dry, I just moved the stencil to another position on the page, and used a wet wipe to pull the paint off the top of the stencil and onto the page beneath.
Above the clearer blue and pink is just using an ordinary wet wipe. But to the left and over the blue you can see a bit more of a watercolour effect where I made the wipe even a bit wetter to get the last of the paint off ♥
And here's where I left the spread on Wednesday night.
I'm anticipating that next week's DLP prompts will feature to make this spread more artsy. Love that I have no idea how this will turn out!
You can join DLP 2016 the unPlanner weekly project HERE - it's only US$12 for the entire year and for that you get 3 inspirational artists posting weekly, prompts, printables, bonus tutorials, and a FB group with supportive online community.


