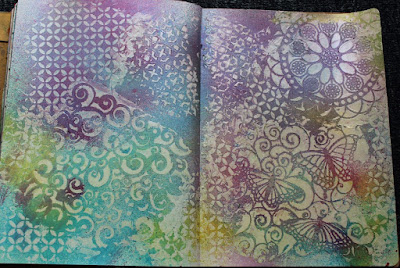
Today we start 2 weeks of school holidays before we head into our hectic Term 4 to end the year. I hope you'll see lots creative from me in the next fortnight as a result. I promised I'd share some tips from the Stencil technique class I recently taught.
I LOVE stenciling. It's one of my go-to techniques when I start a page or when I get stuck or when I just need a final finishing touch. First some useful general tips : I always put masking tape on the middle journal seam, particularly when using inks or sprays. This stops seepage of paints through to other pages in your journal. And I always place Baking paper underneath the current pages so I'm protecting journal pages behind
We talked about favourite stencils and having fun with different sizes of the same design
You can get a lovely background with lots of patterning without being too overwhelming by using a monochromatic palette
I love how you can get multiple prints from a stencil and one spray of ink. You can of course spray on one page and then print to the other side
Spray through a stencil to your paper. Do not move your stencil, but instead place another piece of paper on top and smooth over. I did this recently with watercolour paper folded into cards. When you remove the top ones, you have the opposite print revealed
Also check out this Youtube clip by Dina Wakley for some more cool techniques with stencils and baby wipes :
My favourite way to apply acrylic paint through stencils is with a cosmetic sponge. The secret is to dab in the paint, and then dab off before pouncing up and down over the stencil. This ensures you don't have too much paint so you get a controlled application and well-defined without bleeding under the edges. Since you couldn't see me in class, watch Stencil Girl do this on YouTube - the less paint = better effect
Reminder - don't forget to use a baby wipe to clean wet paint from the stencils onto another paper. I kept cleaning off during the night and ended up with this watercolour page for later uses
You can also apply acrylic paint as a layer, and then wipe that wet paint away with a baby wipe within the stencil design to reveal beneath (also demonstrated in Dina's YouTube above I think)
Another Stencil Girl demonstration on YouTube HERE with step by step sponge and that baby wipe technique
You can add gorgeous raised texture by applying modeling paste through a stencil with a palette knife
You can tint it before or add colour on top after of course
You can also use gel medium or clear gesso as a resist - sponge or apply with palette knife through your stencil and then spray or apply glaze (thin layer of paint) over top, rubbing the wet off to reveal the resist pattern :
Above on the night, below a whole page
Use white gesso or titanium white paint through a stencil followed by a glaze to give you a different colour effect in a space : below I added white hearts within the body before applying a thin layer of blue. See the finished spread with additional stenciling HERE.
As an alternative to paints and sprays, you can use your distress ink pads with a finger blending tool
or put gel medium through and add glitter
Also fun to use with sandpaper!
I loved teaching this class and being reminded of fun techniques. Very cool to see the effects on the student work :
Even discovered that you can purcahse a few fun stencils at Mitre 10 (a local hardware store)
I worked my demo straight into my current altered art journal and this is what I ended up with by the end of the night.
No plan as I went, but can you see a face shape on the left page? Afterwards, it evolved into this spread which I am very happy with :
You will guess from my sharing of YouTube above, my most recommended person for Stencil techniques and inspiration is Mary Beth Shaw - Stencil Girl : Stencil Girl Blog and videos on YouTube. Also search her name in YouTube.
I took wonderful classes years ago from Mary Ann Moss and Roben-Marie Smith but sadly they don't offer them now. Julie Fei Fan Balzer's FREE stencil class is still available HERE
This is a great class and contains information about using stencils with different mediums. Great for beginners but I also re-watch it periodically and am re-inspired.
I hope you've been inspired to play with stencils. If you're in the Wellington area in October, there's a day out you might like : event info on FB HERE.
Looks like lots of paints, sprays, inks, stencils for sale....May see you there!
If you've got other recommendations for links for stencil inspiration please add them in the comments. Wishing you a creative weekend and talk to you soon.


Awesome list of techniques thanks. I am particularly pleased to learn how to apply acrylic paint through a stencil using a cosmetic sponge
ReplyDeleteI am so pleased to hear it's useful. They are a great love of mine and Stencil Girl is so awesome - could spend hours watching her on YouTube! Have fun :-)
DeleteAnother great class! The full page of gel resists really turned out beautifully. Fun to see some of the student work, too. Thanks for this post.
ReplyDeleteThanks Nancy. Yes that was an old page of mine - might need to repeat that soon :-)
ReplyDelete