Showing posts with label Coloured pencils. Show all posts

Monday, June 17, 2019

Paint over collage and metallic watercolours

When I taught a class about Faces recently, one of the techniques I shared was paint over collage. Check out that previous post for details of the process.  I figured if I glued the magazine face I was demonstrating into my journal, it would be a page starter! 
She's on a double-spread so I can do a lot with her hair, and I was very inspired by a recent Book of Days lesson with Effy : (as seen on her blog HERE)
Really fun to combine both ideas and this is how mine developed
Added metallic watercolours over the top of both the watercolour ground and the black gesso. The photo does not do the glimmery shine justice. 
I love using the technique of good quality pencils for final face detailing (I use Polychromos by Faber-Castell)
and I used a White Uni-Ball Signo pen for the flower doodles in her hair
Left her for a day to see if she needed anything more since I usually add words, but she's telling me she's done.
You can still join us in Book of Days HERE. 

Thursday, November 23, 2017

Daily Journaling Week 47

I'm following the prompts of the original Documented Life 2014. Week 47 : add a map of your town or country And from the blog for Life Documented 2017 HERE : 
Prompt: A doodle week in colour incorporating a tip in and tag.
Technique: Use any pens of your choice
Straight away I loved the idea of adding a map, so I began with that before thinking of what next....I have a really cool old book of NZ maps and I'm feeling the need to create a face this week so purposely positioned the Palmerston North (my home town), and on the opposite page chose a map that had pretty colours - part of that page had a chart that was very cool in its patterning, so that went on as well
I added a layer of clear gesso so that I could start my face with coloured pencils and then move to pens. I did my face very quickly using polychromos colouring pencils and a blending stump. 
LOVE her and decided I'm not touching her again....Now to consider how to tackle my other page and thought I'd treat it completely separately and go with pen fun. Started by laying down colour with lovely Tombows blended with water. 
Then time to doodle - I mostly used my moonlight pens for this since they are so bright and gorgeous. I'm dreaming of Summer SHINE ♥ 
Doodles inspired by what's on the paper collage and my own loopy lettering
So ended up with 2 separate pages to meet the challenges this week.
Happy with life and my creative energy....only 5 weeks of challenges for this year to go! You can see all my posts about this project HERE and my Flickr album HERE.

Sunday, March 5, 2017

Book of Days : Self-Love Portrait

This art lesson from Book of Days was an expressive self-portrait - doesn't necessarily look like us but expresses who we are on a soul level - honouring what is lovely about ourselves. First thing Effy set us was a task during the weekend to make a self-love list - I was so happy that I managed to fill up a page in my Inner Work journal! ♥
I glued watercolour paper into my journal because I wanted to try watercolour techniques. Unfortunately I had to put masking tape in because I'm recycling an old book - just hope it doesn't spoil my girl. We started the face from the lips up! - this is an unusual technique in the mixed media world. Effy used Jane Davenport's new Mermaid markers but I just used some watercolours I already own - Koh-i-noor dye stack and some sparkling H2Os
This is a close-up of the lovely effect from adding Yellow Rose H2O on top of other colours - will have to use this again. Click on the photo to see it larger
Here's my initial background
and with gesso added - I love the tapa shapes and am lucky to have it in a few different stencil sizes
I needed to make a decision about which colour pencil to use on my face - I have samples in a workbook - these are my lovely polychromos pencils which I bought specifically for face shading (work really well with blending stump over clear gesso)
Decided the Caput  Mortuum worked best with my red colours, and used Inktense colours for the lips and eye - very happy with how my face turned out
Then it was time to tend my tapa background - I added green/gold paint but rubbed it with baby wipe so it barely shows except the gesso isn't so stark - and gold metallic sakura adds the perfect sparkle
I added the same sakura gold for writing all the things I love about myself into her hair and at this stage considering if she is done
I decided I couldn't resist a few more of my fav swirl doodles in the strands I'd left blank
It's subtle but I love the detail and SHINE the metallic pens add
And here she is finished
See my Flickr album for all my art from classes with Effy HERE. Sign up to Book of Days or other classes with Effy Wild HERE. 

Tuesday, January 10, 2017

FFII : Week 5

Effy's 8-week online class Facing Forward II : the things we need to hear is open indefinitely. Just as well for me - this is my week 5 girl. I started with a blank piece of paper that will be glued into my art journal since this lesson is all about the doodles and for once I didn't want any background distractions.
After my initial outline, there was a bit of thinking about what I wanted to convey - looking at my art symbols dictionary helped with some of that. I am thinking about Shine (obviously) - stars and sun, growth (leaves and flowers), creativity (spirals and swirls), love (hearts), lightness (feathers) and chandeliers (sparkle). I did the doodling and forgot to take a progress photo til I had added some of the colour as well - must have been having too much fun :-)
What a difference more colour makes! I ♥ taking progress photos. This is all the initial colour done before starting on the skin : 
I changed pieces in her hair from orange to red once I added orange to the head piece. I used a mixture of Tombows and Aqua markers since I have limited colours in both. I really wanted the yellow at the top so used Inktense pencil activated with Iridescent medium for that. I also added Iridescent to the heart area because I didn't want to waste it! I have used my black Pitt pen to redefine the swirls in the yellow, the hearts, and the leaves. Thinking the rest might need different attention....
Added flesh tone here using a large PITT marker. This lesson was all about using just markers and pencils. 
Bit more uneven than I would have liked, and darker than I expected from a pen called "light flesh" - maybe it's my paper. I have enough experience now to not be concerned cos I know this is just the first layer. Once the layer of clear gesso over this had dried it was time to add pencils. Click on the photo to see pencil brand and softened effect.
Final touches
I recently bought some vellum shapes featuring lots of gold - thought she could do with a necklace form and I hadn't managed to include a feather (for lightness) in my doodles 
If you've seen anything of my blog this year, you won't be surprised by my affirmation ♥
Enjoyed this lesson more than I expected to and love the outcome. 
So fun to explore different techniques and push myself to try things I wouldn't normally do. See all the blog posts about the faces I've created in this class HERE. See my Flickr album for all my art from classes with Effy HERE. 

Tuesday, October 25, 2016

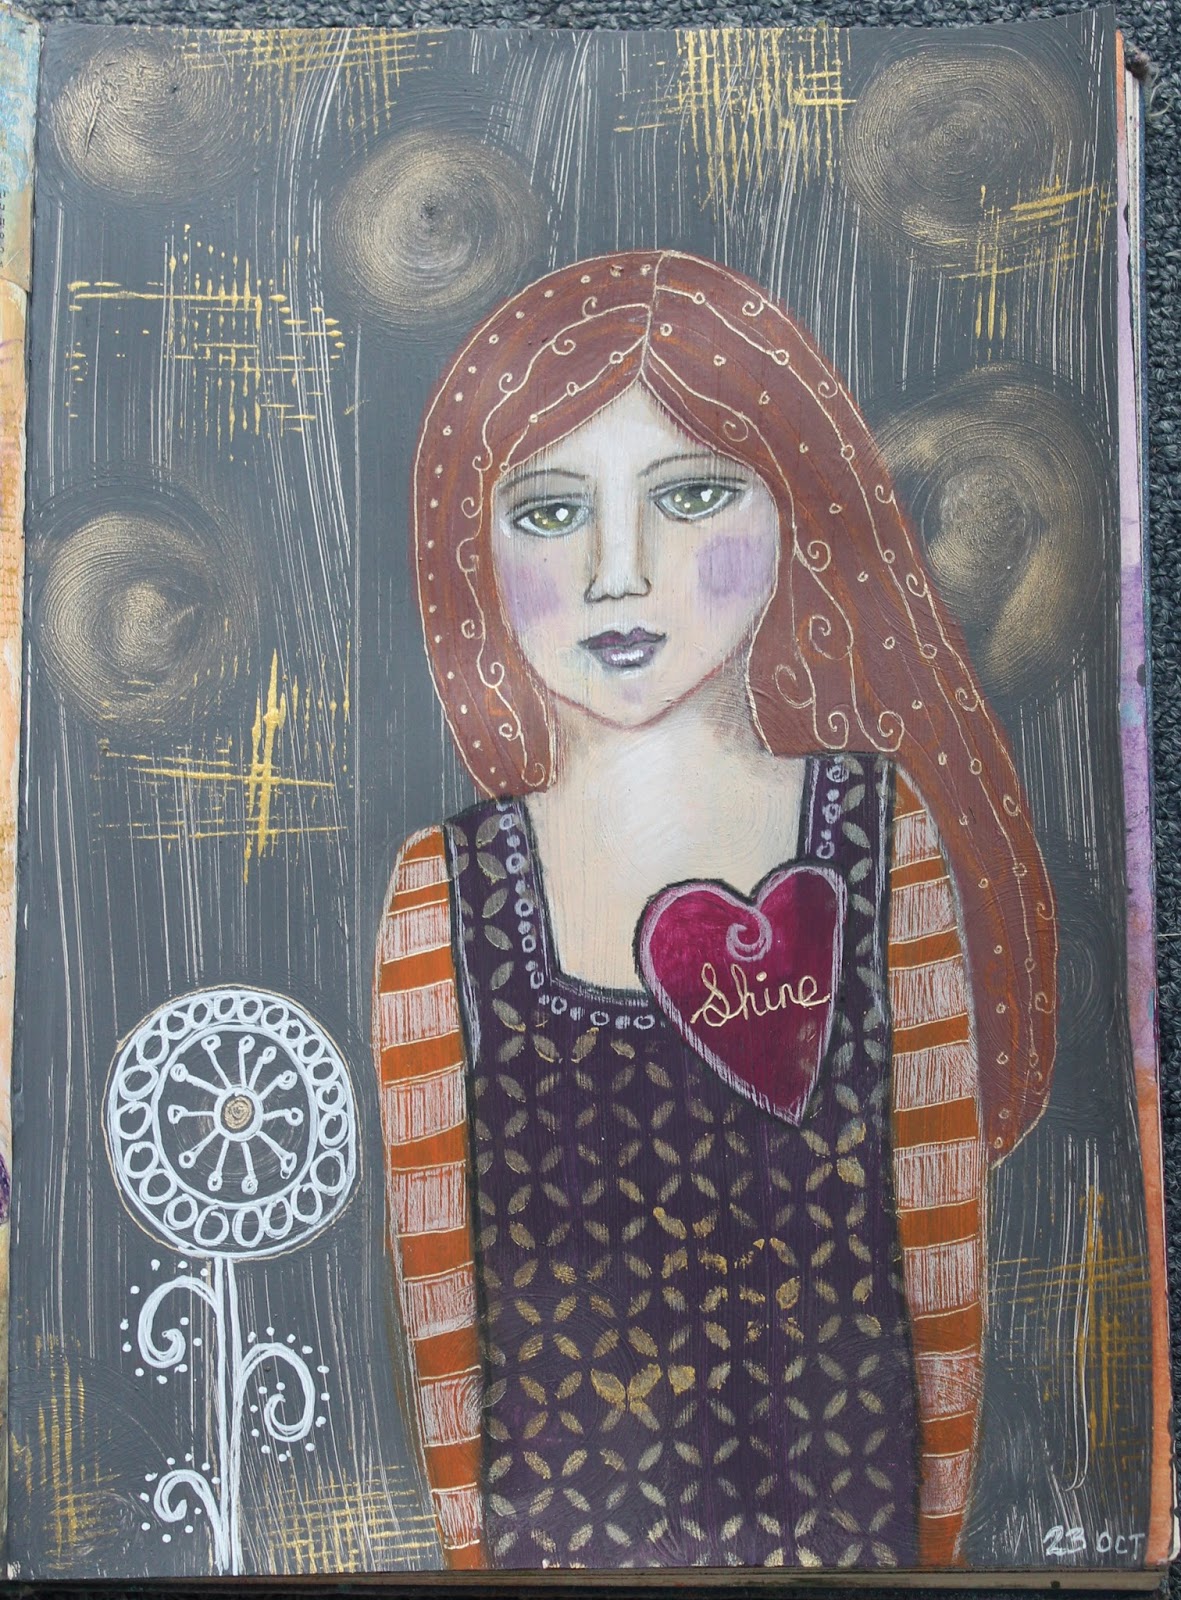
LB2016 : Smiling heart

This was a Life Book 2016 lesson with Angela Kennedy. I initially thought I wouldn't do this lesson and would just watch the videos to see how she uses coloured pencils. But once I watched, I decided I wanted to try out a few of her techniques. 
First applied white gesso mixed with cheap black acrylic and made marks with paint brush. Quick and effective and a departure for me who loves a busy/collaged background but it's very dark (spoiler alert - I don't leave the background alone!)
After dry I can start sketching in the girls' outline but because the background is too dark for her face base I applied some more white gesso followed by some portrait pink acrylic. Face sketched and some colour blocking here. 
I've been using coloured pencils quite a bit in my faces lately for shading - a technique I've been learning from Effy Wild in the Facing Forward class. Angela has a slightly different approach, blending darker colours with a lighter pencil colour. Unfortunately I don't have light pencils, but I used transparent zinc white paint (as discussed here) for blending. I did some work with some of my water-soluble pencils too - the cheeks went a bit bright but were also saved with the zinc white. In the end, you have to use what you've got or you'll just end up buying endless supplies!  My face shading colours (Faber-Castell Polychromos brand) are 4 different browns and I also have a black and white (used on the dress, sleeves, heart below). The brighter colours (green eyes, pink cheeks and lips) are Derwent Inktense - once they are water activated they are permanent.  
Bit more face detailing and started to add some pencil into her hair too. Pretty happy so far but I feel she needs something else...
Time to add some sparkle. Metallic rub-ons are creamy and grab texture on the page. The metallic pen is a favourite Sakura Gelly roll.
Although I admire Angela's more simple style, my girl needed "Shine". Added gold through stencil to her dress and finishing background touches with corrugated card pressed in gold paint.
Click on the photo to see it larger, or go HERE to see my Flickr album of all my Life Book 2016 projects. You can see all my posts about Life Book this year HERE.
If you're wondering abou Life Book, Tam has just released a FREE Life Book Taster HERE. It's a FULL lesson from the beginning of the year and includes a meditation, videos that you can download and keep, plus fully detailed PDF. It's a great example of the kind of lesson you get from Tam - almost monthly. This is a photo of her project : 
and this was my version from January
Sign up for Life Book 2017 HERE and there's a 20% off coupon anyone can use this year!
Related Posts Plugin for WordPress, Blogger...