Sunday, March 15, 2015

LB2015 : Layers of my heart

The first Life Book lesson of the month is always created by Tam the awesome creator of this amazing year-long class {I am an enthusiastic life-booker!}. I really wanted to do this one, but had a 21st birthday quilt project that I needed to finish first (see previous post). We made seven gratitude hearts that stack together with a brad, and can fan out.
CLICK ON ANY PHOTO TO SEE IT LARGER
Cut the hearts from watercolour paper, and after colouring the bases in various ways, they were ready to capture the things I'm grateful for in my life. Here they are individually :
Ink sprays, washi tape (had to glue it!), rub-ons, hand stitching

Machine stitching adds so much 
Gel medium resists with watercolour wash over the top
Useful tip - take photos of your work when you think you're done, and look at them on a screen. I had thought the above was done until I did that and realised it, too, needed stitching around the border.
Paper serviette coloured with watercolour paint
Then we created an enveloped page to store the hearts. First layers of sprays and stencils - deliberately aiming for contrast between individual heart colours and envelope! :
I wanted to include music lyrics and One Republic are playing in my car at present :
Love that I was able to include quite a lot of stitching in this project. Here's how it looks all complete :
Now I'm very excited to look at the next Life Book lessons with Jane Davenport AND Tam has given us a full bonus lesson from 2014 as well for the week! Thankfully there's just an artist interview for this coming week's offering, so I've got time to catch up until the next full lesson is posted 24th March.
You can see all my posts about Life Book HERE and I've created a Flickr album for all my Life Book projects HERE

Saturday, March 14, 2015

Mystery Quilt completed for 21st

A niece had a 21st birthday this month. When I can, I make quilts for such occasions. I hadn't realised that this year was significant and it caught me on the hop. Luckily, I had a quilt top in my drawer which I had been wondering how to finish. 
It was a mystery quilt which I completed in 2013 and you last saw HERE. The above is the top before borders. I had added a really wide border because I thought it would be nice with some applique...
That didn't happen in the 18 months since I "finished" the mystery. The quilt was obviously waiting for the inspiration of Steph who is a funky girl who loves black and lime green. I bought some black batting, and this cool fabric to back it with and some variegated thread
Here's the full quilt top lying on the black batting :
I baste my quilts with a spray adhesive and then safety pin them around the edges. The white you can see underneath is an old sheet to protect my carpet from any overspray! I stitched with black thread near the coloured strips to keep the square shapes firm, and then free-motion quilted swirls around the stars - click on any photo to actually see the stitching detail.
I knew those four blank squares needed to be filled, so appliqued tapa flowers which worked very well
In the borders I quilted with the same swirly design but on a bigger scale
I love the effect of the variegated thread.
I did a simple label using a sharpie stained pen
and a handmade card which was easily completed from a base I recently shared
Here is the finished quilt. It looks even better if you click on the photo to enlarge it.
Unfortunately I haven't been able to deliver it personally but it was fun to finish with her in mind.

Thursday, March 12, 2015

Week 10 : DLP 2015

Information about the FREE Documented Life Project is HERE. It's a new month with a new theme :
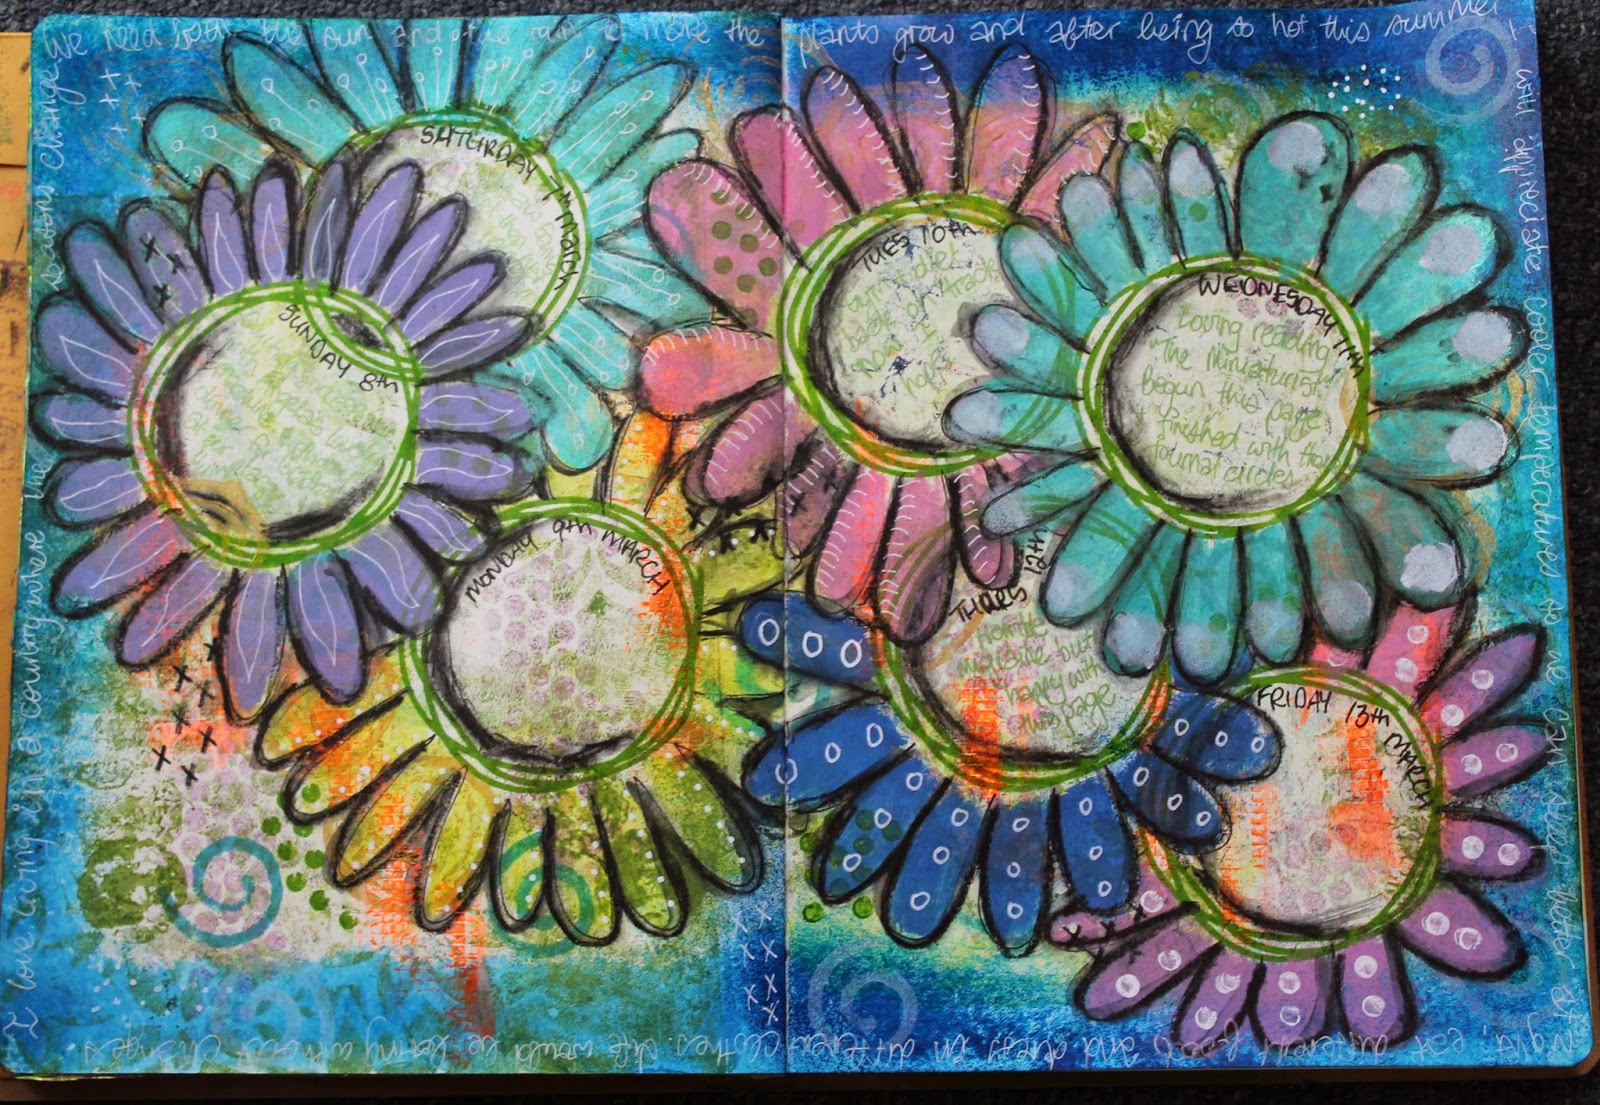
This week's challenge dovetailed in very nicely with Traci Bautista's FREE online Strathmore Workshop. Her workshop is called "Bold, Expressive and Unconventional Printmaking" and well worth checking out. Inspired by her lesson in week one (see her blog photos HERE) I started with some gelli printing
I love that soft, grungy look. Spoiler alert - enjoy this look while you can cos I end up a long way from here!! Next step was to add marks with sponge and cork
paint and drywall tape, ink pad and bubble wrap
my own carved stamp with gold paint
My thinking so far is summer colours : blue sky, flashes of hot, the gold circles reminding me of the sun, some green coming back at our beginning of autumn with a bit of rain. Because I edged the page with blue, I decided I wouldn't do my journaling on the side as I usually do. This cool scribbly circle stamp is going to be spaces for my daily entries this week.
More mark making 
This is how my page looked when I left it last night. I like it, but can't call this done...
Today I decided I really have to have flowers, so I drew on petals and filled them in with paint
They needed a darker outline so I used the stabilo pencil from above, but instead of using the stump to blend as I did here
I used water to blend -  it made the outline very dark and definite
so I softened the look of the flowers by adding various white marks inside the petals
Then I journaled around the entire page with a line of writing about how I like the seasons changing - that's my "surviving the elements" part of the challenge. And I've written in some of my journaling circles so you can see that the green pen doesn't detract from the overall effect of the spread. Click on the photo to see the details larger.
You can see all my posts about this project HERE and I've created a Flickr album for all my Documented Life 2015 spreads HERE.
Related Posts Plugin for WordPress, Blogger...